Part 1: Brands, Packaging, & Measurements
Brands
There are a lot of different brands of sewing patterns, but in general, they use the same terminology and symbols.The brands that I used in this tutorial include:
- Simplicity
- Butterick
- McCall's
- Burda
Other brands include Vogue, New Look, Kwik-Sew, and many more. The overall simplest patterns to use are, as the name implies, Simplicity. Newer Simplicity patterns, dated from the 2000's onward, can still be quite complex, but not as much as some other brands. Older patterns, Simplicity or otherwise, such as those from the 1980's, are a lot simpler, but it's a bit of a double-edged sword. Though there's less terminology and symbols to look at, there's also less guidance. Older patterns were of the cut-and-sew variety, meaning the pattern was only there as a template, and most of the sewing that you had to do would be from memory or another guide source. Newer patterns give you guidance on sewing, but can be intimidating to look at.
Packaging
For this tutorial, I rely mainly on a slightly older Simplicity pattern. It's dated 1995 and is simple to look at, but also includes all of the terminology and symbols commonly seen across multiple pattern brands. The packaging contains only the pattern, not the fabric needed to make it. In a sense, it contains the stencil that you'll use to cut out your fabric.

Front:
Pattern NumberIn the top left-hand corner, there is a series of four numbers, this is the pattern number. The pattern number is not always at the top-left, sometimes it is centered or on the right, but it can usually be found at the top and will be a series of four numbers.

When you're buying patterns in a store, generally you don't dig through bins of patterns right away. There's usually a table and chairs with books of different patterns laid out. You look through the books, which show you pictures of the pattern packaging, and once you find one that you're interested in, you check the pattern number and then go dig through bins or drawers to find the actual package.
Pattern numbers are also useful to know when sharing information about patterns that you find useful. They're akin to a pattern's unique name, even though some newer patterns do have official names or titles, the most accurate way to describe a pattern is with it's number. This pattern would be described as "Simplicity 9682". Knowing the year also helps, because with new releases, pattern companies tend to re-use numbers. Generally it's not an issue though, because usually when we share pattern numbers, it's because the person we're sharing them with intends to go and buy it, and if it's still in stores, the pattern number is still the same.
Pattern Size & Measurements
Below the pattern number, or elsewhere on the top, depending on the brand, you can find the pattern size. Each pattern package contains three or four sizes.

Pattern sizes vary dramatically from off-the-shelf clothing sizes. This one is labeled "Size U", which is about the most unhelpful size I've ever read. Next to that, it specifies "16, 18, 20", but these are not the same as a size 16, 18, or 20 dress that you would find in a store. On the back of the packaging, there is a list of measurements that indicate what size pattern you need. It usually looks something like this:

According to this pattern, someone with a 24 inch waist is a size 8. (Normally in off-the-rack clothing in the US, someone with a 24 inch waist is a size 0 or 2. In the UK, this is equivalent to a size 4 or 6.) If not all of your measurements match exactly to the same size, which they most likely won't because everyone's built differently, I recommend buying whichever size your largest measurement fits, because it's easier to alter patterns to be smaller than it is to make them larger. The only exceptions to this guideline include length measurements, such as back-neck to waist, since lengthening garments is relatively easy to do.
 |
| Download it, save it, print it out, keep it. |
Knowing your measurements is a really important part of learning to sew for yourself, or if you're sewing for someone else, you need to know their measurements. Here's a really helpful chart for keeping track of your measurements. This chart also works for men, though men need an extra (inseam) measurement for pants as well. Do whatever you need to do to know these measurements as well as you can when you're shopping for patterns. You can memorize them, put them in your cell phone, write them on a post-it, or just plain bring the entire chart with you to the store. No one will care, I promise, we all just know that you're trying to get the best fit for your body, and that's admirable. The three most important measurements to know are bust, waist, and hips, unless you're only buying a pants pattern, in which case you'd need waist and waist to foot.
Back on the topic of the packaging:
Styles
Pattern "styles", or what the pattern will actually make, are indicated next to the picture(s) on the front of the pattern packaging.
Pattern "styles", or what the pattern will actually make, are indicated next to the picture(s) on the front of the pattern packaging.

This pattern can be used to make three different styles of a dress. The styles are labeled A, B, and C, where A is a summer dress with a sheer overlay, and B and C are single-layer summer dresses (no overlay), with B being a shorter version of C. It's a little confusing, but that's why there's pictures instead of just descriptions.
Back:
The back of this package looks really daunting. There's a lot of text and numbers, and it looks pretty complicated. Not to worry though, the entire right half is in French. Most patterns will have one or two translations, both on the package and on the pattern pieces themselves, and they're usually in Spanish and/or French.
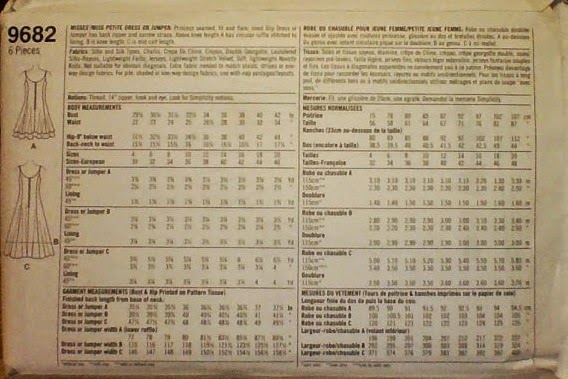
Pattern Number
Again, the pattern number is on the top-left. It also says how many individual pattern pieces are included in this pattern. When you take the pieces out, they're on large sheets of this paper, and you have to cut them out first to use them with your fabric. This pattern has six pieces, so you might take out three large sheets of paper, and each large sheet will have two pattern pieces on it.
Again, the pattern number is on the top-left. It also says how many individual pattern pieces are included in this pattern. When you take the pieces out, they're on large sheets of this paper, and you have to cut them out first to use them with your fabric. This pattern has six pieces, so you might take out three large sheets of paper, and each large sheet will have two pattern pieces on it.
Back Details
Also on the left side, this package shows the back details for all of the styles of dresses shown on the front. Patterns with more variations or more pieces, such as accessories, will show more detail pictures so that you know exactly what you're getting.

Description, Fabrics, & Notions
At the top (disregarding the French half), you can find a detailed description of the garment that this pattern can make, what fabrics are recommended, and what notions you'll need. This one looks like this:

Some Quick Vocabulary:
- pile - The extra thickness of fabric that can be found in fabric types such as fleece and velvet.
- nap - The direction that the pile lays in, easiest to see in velvet or furs (the "correct" direction of the fur/velvet)
- You need extra fabric for thing such as pile or nap, because ideally the pile and nap should be the same throughout your clothing. If you're using fur, for example, you wouldn't want the fur on the front of a coat to go downward, the fur on the back to go upward, and the fur on the sleeves to go sideways. It should all go in the same direction, downward.
- notions - also referred to as "hardware"; pieces that you use in clothing that you cannot usually make yourself, such as zippers, hooks and eyes, thread, and buttons.
- Patterns will often recommend buying the same brand of notions to match the pattern. This is not only to promote their own products, but also so that all of your notions match the measurements of the pattern. For example, some hooks and eyes are looser or slightly larger than others depending on brand, and some zippers can be slightly narrower. It is best, if you can, to match the brand of notion to the brand of pattern that you're using.
Measurements, Size, & Fabric
I already covered measurements and size, but it come into play again here. The back of the packaging will also tell you how many yards of fabric you need to buy. Once you know your measurements and size, simply follow the column downward to the style you want to use, and the width of the fabric you're buying.

Fabric Width:
When you buy fabric, it's rolled up on a bolt (basically a rectangular piece of cardboard), and can come in a width of 45 inches or 60 inches. To actually purchase the fabric, you need to have it cut by an employee, and it's usually measured by the yard. In this example, if you're making a size 10 dress in style A, and your fabric is 60" wide, you'll need to have 2 and a half yards cut.
For other styles, just follow the column farther down.
Garment Measurements
At the bottom of the package, you'll find the actual measurements of the finished garment, or at least what they're supposed to be if you make it 100% correctly.
No comments:
Post a Comment